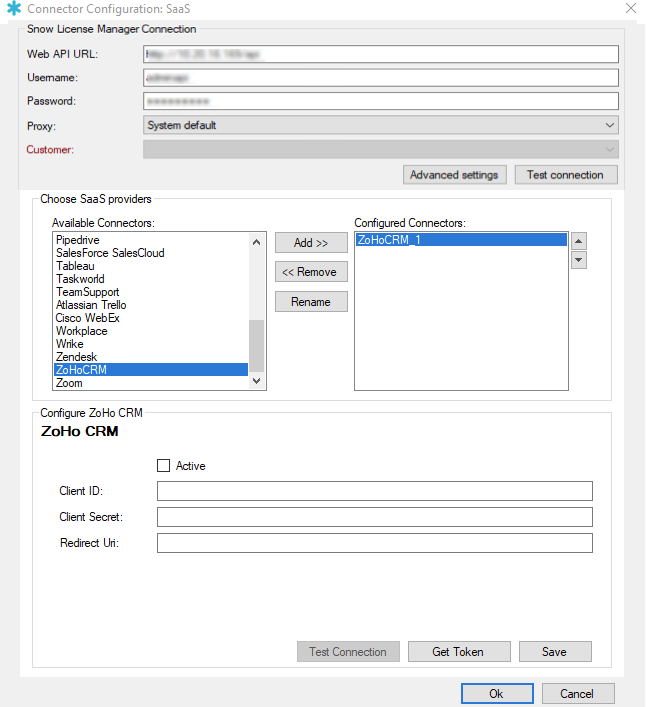
Configuration of Zoho CRM
The Snow Integration Connector for Zoho CRM is used to display users marked as "Active" by the Zoho CRM API.
The configuration must be started and prepared according to SaaS connector configuration.
Prerequisites
A Zoho CRM user account that has been assigned a profile with Zoho CRM API Access.
Set up a Zoho CRM client
-
Sign in to Zoho CRM admin console, via https://accounts.zoho.com/developerconsole
-
Sign in with a user account assigned a profile with Zoho CRM API Access.
-
You are taken to one of two views, depending on if you already have apps or not:
-
If you already have existing apps in Zoho CRM, select ADD CLIENT.
-
If you do not have any apps in Zoho CRM, select GET STARTED.
-
-
You are presented with multiple choices. On Server-based Applications, select CREATE NOW.
-
The Create New Client form appears.
Client Type is pre-selected with Server-based Applications.
-
Enter your Client Name and Homepage URL information.
-
Enter your Authorized redirect URIs.
-
Select CREATE.
The Client Secret tab appears.
-
Copy the values for Client ID and Client Secret. These will be used for the authorization process when configuring the connector.
You can return to the Zoho CRM admin console at any point to see the values for Client ID, Client Secret, and Authorized redirect URI.
If you need to configure the app for other regions, this is done on the Settings tab of your configured client, with the Multi-DC feature.
Configure the Zoho CRM connector
In the Configure section at the bottom of Connector Configuration: SaaS:
-
Select the Active checkbox to enable the Zoho CRM connector.

-
Enter the values that were acquired in Set up a Zoho CRM client, in Client ID and Client Secret.
-
Select Get Token.
A web window opens.
-
Enter Zoho CRM login credentials for a user account that has admin privileges.
-
After a successful login, select Accept.
Having logged in successfully, a dialog box will indicate whether the authorization process was successful or not.
If the token authorization process and aggregation fail, the cause may be that the refresh token has become invalid. This is most likely the problem if the Snow Integration Manager log file contains the message No ZoHo refresh token was included with the authorization response. To resolve this issue, Recreate the OAuth token.
Recreate the OAuth token
If the token authorization process and aggregation failed in Configure the Zoho CRM connector, recreate the OAuth token.
-
Open the Zoho CRM admin web page, https://accounts.zoho.com
-
Login by using an administrator account.
-
Select Active Sessions.
-
Select Connected Apps.
A list of connected apps appears.
-
Locate the app with the name that was entered in Set up a Zoho CRM client.
-
Select the trashcan icon to the right of the app. This deletes the existing connection.
-
Continue from Step 3 in Configure the Zoho CRM connector to finish the authorization process.
Flexera does not own the third party trademarks, software, products, or tools (collectively, the "Third Party Products") referenced herein. Third Party Product updates, including user interface updates, may not be reflected in this content.