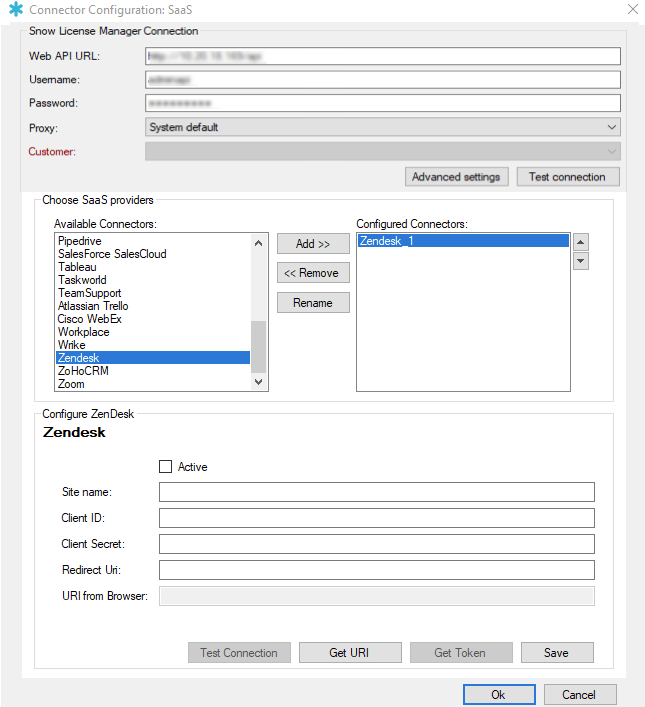
Configuration of Zendesk
The Snow Integration Connector for Zendesk is used to determine the number of registered Zendesk users.
The configuration must be started and prepared according to SaaS connector configuration.
Prerequisites
Credentials for an account with admin privileges for your company's Zendesk website are required.
Set up a Zendesk app
-
Log in to your Zendesk website using an admin account.
-
On the Zendesk dashboard, navigate to the channel API and accept the Terms of Service.
-
On the OAuth Clients tab, select + to create a new API client.
-
Configure the client:
-
Enter Client Name , Description, Company, Logo, and Unique Identifier.
-
In the Redirect URI box enter the value for a redirect uri.
noteThe redirect URI can for example be http://localhost:8080 if it is not used by another application.
-
Select Save.
A secret token is generated.
-
Save the generated secret token.
The token is used when configuring the connector. It is possible to generate the secret token later from the Zendesk API page.
-
The API client is created and the Unique identifier appears on the OAuth Clients tab.
The information is used when configuring the connector.
-
Configure the Zendesk connector
In the Configure section at the bottom of Connector Configuration: SaaS:
-
In the Site name box, enter the subdomain of your Zendesk website.
[EXAMPLE]
The subdomain of
https://exampleteam.zendesk.comis exampleteam.
-
In the Client ID box, enter the value for Unique Identifier of the created API client in Set up a Zendesk app.
-
In the Client Secret box, enter the secret token generated in Set up a Zendesk app.
-
In the Redirect Uri box, enter the value for the redirect uri of the created app in Set up a Zendesk app.
-
Select Get URI.
The All good dialog box appears.
-
To authenticate and generate the URI for the URI from browser box:
-
In the All good dialog box, select OK.
A default browser opens.
-
Enter the credentials for your Zendesk account and select Sign in.
-
Select Allow to allow access for the Zendesk application.
A uri will appear in the browser address field.
-
-
Enter the uri in the URI from Browser box.
-
Select Get token.
A message saying that the token is successfully acquired will appear.
-
Select Test Connection to check if the connection can be established.
-
If the connection could not be established, verify that the connector has been configured according to Step 1 till 9 of the Configure the Zendesk connector.
-
Select the Active checkbox to allow the data to be aggregated.
-
Select Save.
Flexera does not own the third party trademarks, software, products, or tools (collectively, the "Third Party Products") referenced herein. Third Party Product updates, including user interface updates, may not be reflected in this content.