Configure the ServiceNow CMDB connector
The sections below describe the steps to configure the ServiceNow CMDB connector.
In Snow Integration Manager, add the ServiceNow CMDB connector and configure the settings.
Set up the SLM Connection
Learn how to configure the SLM Connection settings.
Set up the Snow License Manager Connection
-
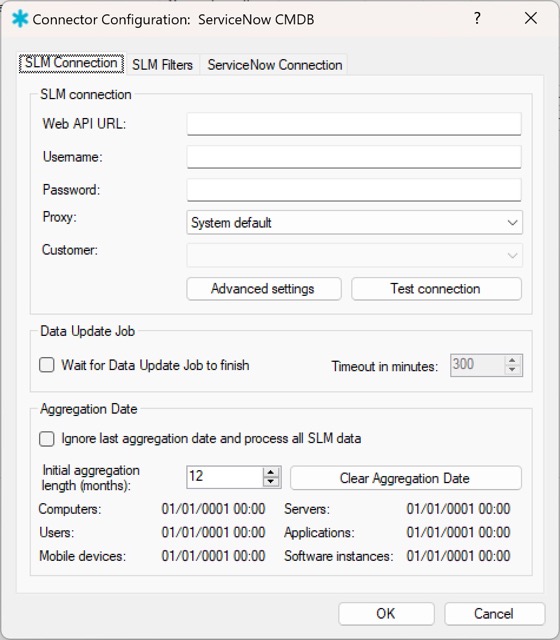
In the Web API URL, enter the URL to the Snow License Manager web API.
EXAMPLE
URL:
http://[your SLM url]:[port]/apinote[Port] is only necessary if Snow License Manager is running on other port than default port 80.
-
In the Username and Password fields, enter the credentials for the Snow License Manager web API user account.
noteThe Password field is case-sensitive, and cannot be copied to the clipboard.
-
To set up a proxy server, select the desired proxy in Proxy. Proxies can be configured in the Proxy profiles tab in the Snow Integration Manager main interface.
-
Select the Advanced settings to enter the SLM connection settings in the Snow License Manager advanced connection settings window that includes:
-
Timeout (minutes): The time required for the connector to receive a response from the server. (Min: 3min, Max: 30min)
-
Retries: The number of retries a connector should perform when a timeout takes place. (Min: 0min, Max: 100min)
-
Retries delay (minutes): The time taken between the SLM connection retries. (Min: 1min, Max: 100min)
-
Default: Selecting this would reset the settings in Step 4 to its default values.
To save the changes made, select OK.
-
-
To verify and establish a connection between the connector and the SLM server, select Test connection.
noteFor a connection established successfully, the Customer field is populated with the customer list received from the SLM server. Otherwise, a Test connection failed popup is displayed.
Set up the Data Update Job
-
Do one of the following:
-
Enable the Wait for Data Update Job to finish if Snow Integration Manager is set to start after the Data Update Job (DUJ). This makes Snow Integration Manager wait for the DUJ to finish before starting the aggregation, giving the largest possible window to export all the data.
-
Disable the Wait for Data Update Job to finish so the connector will not consider the DUJ status when running the data aggregation process.
-
-
If the Wait for Data Update Job to finish is enabled, select the Timeout in minutes, which represents the waiting time taken for the connector, once the SLM server stops responding. (Min:1 and Max:1200)
Set up the Aggregation Date
-
Do one of the following:
-
To upload the full data from Snow License Manager without carrying out the last aggregation dates for the respective aggregation subjects, select Ignore last aggregation date and process all SLM data.
-
To set up the configuration since when you want to aggregate the data as given below, disable the Ignore last aggregation date and process all SLM data:
-
Initial aggregation length (months): The period interval of months for the initial aggregation of the inventory data.
-
Clear Aggregation Date: Resets the last aggregation dates for the data aggregation subjects.
noteThe labels below Clear Aggregation Date provide the last aggregation date for individual data aggregation subjects.
-
-
Set up the SLM Filters
Learn how to configure the SLM Filters settings.
Set up the Filters
-
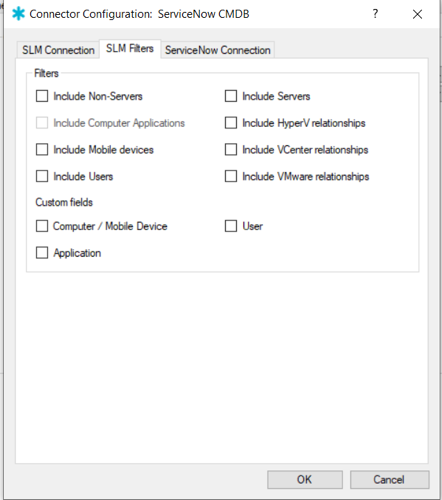
Select the checkboxes for the data types that need to be transferred to ServiceNow CMDB. The selected data types are included in the aggregation process.
noteYou can see grayed out checkboxes for data types dependent on other data types if no checks are done already for any dependent data types.
Set up the ServiceNow Connection
Learn how to configure the ServiceNow Connection settings.
Set up the ServiceNow connection
-
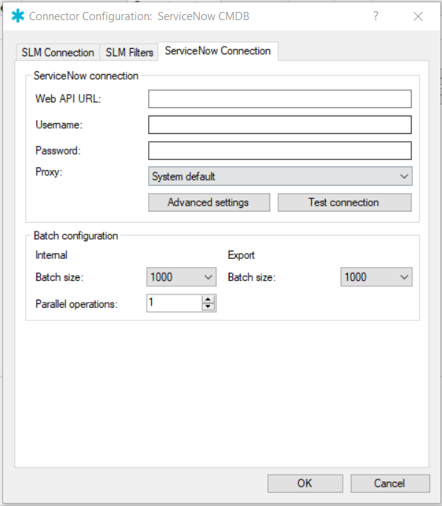
In the Web API URL, enter the URL to the ServiceNow web API.
EXAMPLE
URL:
http://[your ServiceNow url]:[port]noteThe port is added where the ServiceNow API is listed.
-
In the Username and Password fields, enter the credentials for the ServiceNow API user account.
-
To set up a proxy server, select the desired proxy in Proxy. Proxies can be configured in the Proxy profiles tab in the Snow Integration Manager main interface.
-
To verify the connection, select Test connection.
-
Select the Advanced settings to enter the ServiceNow connection settings in the ServiceNow advanced connection settings window that includes:
-
Timeout (minutes): The time required for the connector to receive a response from the server (Min: 3min, Max: 30min).
-
Retries: The number of retries a connector should perform when a timeout takes place (Min: 0min, Max: 100min).
-
Retries delay (minutes): The time taken between the ServiceNow connection retries (Min: 1min, Max: 100min).
-
Default: Selecting this would reset the settings in step 5 to its default values.
To save the changes made, select OK.
-
Set up the Batch configuration
-
Enter a value for the Internal Batch size and Export Batch size to allow for manual selection of batch sizes. The size should be lowered if timeouts or apex errors appear during aggregation.
noteThe export batch size can be greater than or equal to the internal batch size. In most cases, the export batch size is dependent on the value provided for the internal batch size. The default value for the Export Batch size is 1000 instances per batch.
-
Select the number of Parallel operations to adapt the configuration performance with your available hardware resources.