Configure the BMC Helix Remedyforce connector
The BMC Helix Remedyforce connector is configured in Snow Integration Manager. For more information on Snow Integration Manager, see Snow Integration Manager.
The BMC Helix Remedyforce connector uses an API connection. It utilizes the REST-based BULK API 2.0 in Salesforce to import objects into BMC Helix Remedyforce.
In Snow Integration Manager, add the BMC Helix Remedyforce connector and configure the settings.
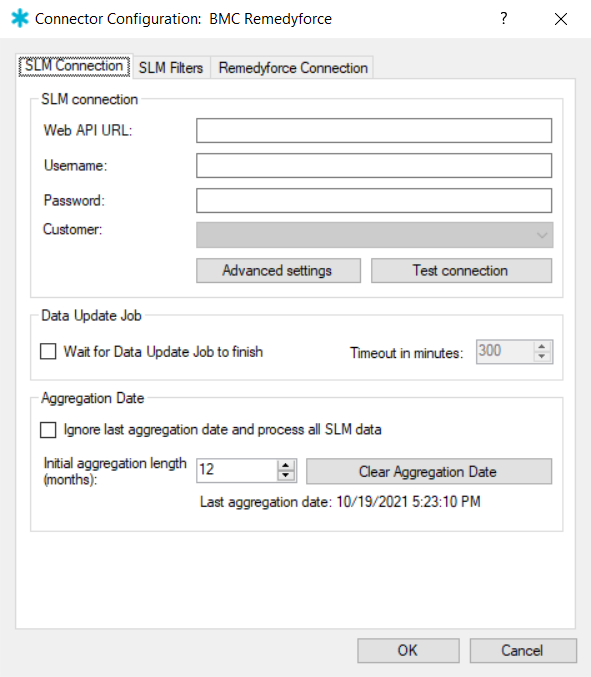
Set up the SLM Connection
Learn how to configure the SLM Connection settings.
Set up the Snow License Manager Connection
-
In the Web API URL, enter the URL to the Snow License Manager web API.
EXAMPLE
http://[your SLM url]:[port]/apinote[Port] is only necessary if Snow License Manager is running on other port than default port 80.
-
In the Username and Password fields, enter the credentials for the Snow License Manager web API user account.
noteThe Password field is case-sensitive, and cannot be copied to the clipboard.
-
Select the Advanced settings to enter the SLM connection settings in the Snow License Manager advanced connection settings window that includes:
-
Timeout (minutes): The time required for the connector to receive a response from the server. (Min: 3min, Max: 30min)
-
Retries: The number of retries a connector should perform when a timeout takes place. (Min: 0min, Max: 100min)
-
Retries delay (minutes): The time taken between the SLM connection retries. (Min: 1min, Max: 100min)
-
Default: Selecting this would reset the settings in Step 4 to its default values.
To save the changes made, select OK.
-
-
To verify and establish a connection between the connector and the SLM server, select Test connection.
noteFor a connection established successfully, the Customer field is populated with the customer list received from the SLM server. Otherwise, a Test connection failed popup is displayed.
Set up the Data Update Job
-
Do one of the following:
-
Enable the Wait for Data Update Job to finish if Snow Integration Manager is set to start after the Data Update Job (DUJ). This makes Snow Integration Manager wait for the DUJ to finish before starting the aggregation, giving the largest possible window to export all the data.
-
Disable the Wait for Data Update Job to finish so the connector will not consider the DUJ status when running the data aggregation process.
-
-
If the Wait for Data Update Job to finish is enabled, select the Timeout in minutes, which represents the waiting time taken for the connector, once the SLM server stops responding. (Min:1 and Max:1200)
Set up the Aggregation Date
-
Do one of the following:
-
Enable the Ignore last aggregation date and process all SLM data to include all the selected data from Snow License Manager without carrying out the Last aggregation date.
-
Disable the Ignore last aggregation date and process all SLM data to set up the configuration since when you want to aggregate the data as given below:
-
Initial aggregation length (months): The period interval of months for the initial aggregation of the inventory data.
-
Clear Aggregation Date: Resets the Last aggregation date by subtracting the Initial aggregation length (months) from the current real-time.
-
Last aggregation date: Updates when the Clear Aggregation Date is triggered and when the data aggregation process ends.
-
-
Set up the SLM Filters
Learn how to configure the SLM Filters settings.
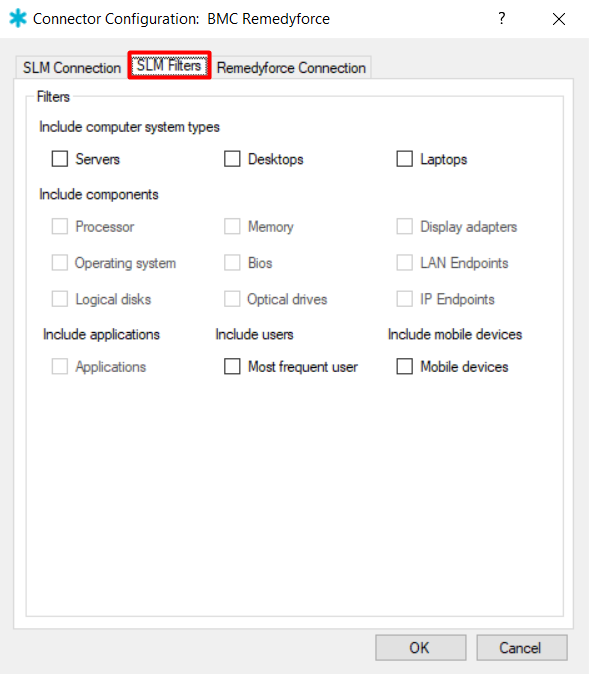
Set up the Filters
-
Select the checkboxes for the data types that needs to be transferred to BMC Helix Remedyforce.
noteYou can see grayed out checkboxes for data types dependent on other data types if no checks are done already for any dependent data types.
Set up the Remedyforce Connection
Learn how to configure the Remedyforce Connection settings.
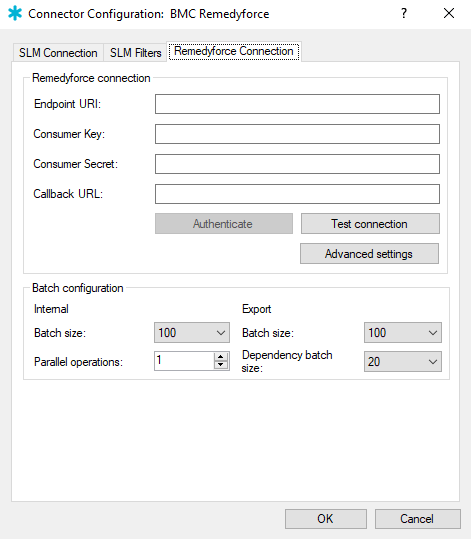
Set up the Remedyforce connection
-
In Endpoint URI, enter the URI for your Remedyforce instance.
notehttps://example.my.salesforce.com -
In the Consumer Key, enter the Consumer Key as noted in Retrieve information from BMC Helix Remedyforce.
-
Enter the Consumer Secret as noted in Retrieve information from BMC Helix Remedyforce.
-
Enter the Callback URL as noted in Retrieve information from BMC Helix Remedyforce.
-
Select Authenticate. A login dialog appears.
-
Follow the login procedure to authenticate the connector with your BMC Helix Remedyforce account.
noteIf Snow Integration Manager is installed on a Windows Server 2016 machine, open Internet Explorer and disable the IE Enhanced Security Configuration setting, or the Helix Remedyforce login window will not work as expected.
A dialog will inform you that the authentication was successful. If you are having issues with the login process, instead select Open default browser at the bottom of the login dialog. This opens the login page in your default browser instead.
After a successful login, copy the URL in the address bar of the browser and paste it into the text box dialog that has appeared in Snow Integration Manager.
-
Select Test connection to verify the connection.
Set up the Batch configuration
-
Enter a value for the Internal Batch size and Export Batch size to allow for manual selection of batch sizes. The size should be lowered if timeouts or apex errors appear during aggregation.
noteThe export batch size can be greater than or equal to the internal batch size. In most cases, the export batch size is dependent on the value provided for the internal batch size. The default value for the Export Batch size is 100 instances per batch.
-
Select the number of Parallel operations to adapt the configuration performance with your available hardware resources.
-
Enter a value for the Dependency batch size for all the
BMC_BaseRelationshipsto be uploaded to the BMC Remedyforce server. The default value is 20 instances per batch.